I usually begin with about a yard of thread. You can use more or less - just remember that the more thread you use, the easier it is to get tangled. Thread all 3 strands through the eye of the needle and pull through until the ends are almost even, (You want one end to be longer, as in cross-stitch). Tie a knot in the longer end.
You will always smock from left to right, and you will always begin in the middle of the fabric. (If you are left handed, you will smock right to left). To find the middle, fold the pleated fabric in half (photo 1). Take your needle and pull it through where the fabric folds. You should have a knot on one side now. Tie the other side in a knot and cut it off. Now you should have a visual aid to tell you where you are to begin each time.(photo 2)
All the smocking patterns I have used begin with a cable stitch. The pattern will tell you which row to begin on. You will use the gathering threads as your guide to keep your rows straight. During stitching, your needle should always be parallel with your guide thread.
CABLE:
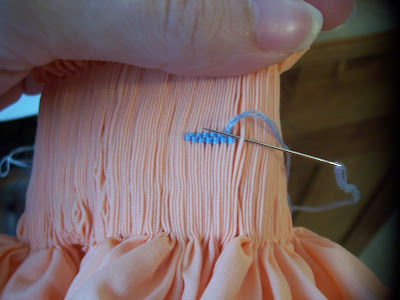
Thread alternates below and above the needle, stitching just the top of each pleat. Take your needle to the back of your fabric and pull it through on the row you will begin on, remembering to start in the middle.(photo 2) The first stitch you make will always cover 2 pleats, after that, you will stitch one at a time.

DOWN CABLE: the thread is "down" below the needle (photo 2)
UP CABLE: The thread is "up" above the needle (photo 3)

Go back and forth (down cable, up cable, down cable, etc. ) until you come to about a half inch from the end, re threading if necessary. (photo 4) When you come to the end of the row, pull your needle through to the back and tie a knot. Turn your fabric upside down, pull the needle up one pleat to the left of the middle, and beginning with a stitch over 2 pleats, repeat everything that you just did all the way to the other end. (photo 5)
 (photo 5)
If you began with a down cable, when you flip it over, you will begin with a down cable also.
Remember:
- The first stitch is over 2 pleats. After that, it is one pleat at a time. Down cable, up cable
- Your needle should always point towards the middle.
- Your needle should stay parallel to your gathering threads.
- Stitch just the top of the pleats. You shouldn't touch the guide thread with your stitches.
- Any questions, just ask!
- Yes, I do need a manicure. Sorry!


2 comments:
Ok - so I used to think I was fairly crafy. But I think I'm a little lost, and yet very impressed with you at the same time. Don't worry, I'm sure others followed along just fine. Remember that I'm the single gal who had to ask what "smocking" was to begin with. And, now, I'm going to know all about it. How fun!
Wow... thank you! I smoked a gown for a friend's baby a couple of years ago and have forgotten... your tutorial 100% put me back on the right track - thank you!!!!
Post a Comment